
If you want your car to look and feel sporty, tinted windows are essential. They help to give the car a sleek profile while maximising privacy, for a more stylish drive. And there are other benefits to window tints too, including keeping out the sun’s UV rays – great if you’re travelling with children or just want to keep your car cool.
If your car doesn’t have tinted windows, you can add them as an optional extra. This guide covers everything you need to know about window tinting, from different types of film and the law, to the process of applying tints to your car.
Use the links below to navigate the guide.
- Tinted Windows – What the Law Says
- What are the Different Types of Window Tint Film?
- How to Apply Window Tint Film in Eight Simple Steps
Tinted Windows – What the Law Says
- The windscreen film must let in a minimum of 75% light.
- The front side windows must let in a minimum of 70% light.
Before you decide to add window tint film to your car, you need to be aware of the laws on tinted windows, as outlined by the Driver Vehicle Standards Agency (DVSA). These rules are for the windscreen and front-side windows only, though there’s a chance you could be stopped by the police if they think rear window tinting is affecting your car’s safety.
If the police or the DVSA suspect that your car doesn’t let in enough light, they can use light measuring equipment to check. If they find that the tint on your windows is too dark you’ll be issued with a prohibition notice, preventing you from driving the car on the road until the tinting is removed. You could even receive a fixed penalty notice or court summons if they feel it’s serious enough.
The laws are there to make sure all drivers have a clear view of the road. It also means that other road users and pedestrians are able to make eye contact with the driver, so they know they’ve been seen.
Window tint manufacturers in the UK aren’t allowed to sell films which don’t conform to the DVSA’s safety limits, so only ever buy aftermarket window tint film from reputable sellers.
What Are the Different Types of Window Tint Film?
Now that we’ve covered off the legal bits, it’s time to look at the different types of window tint film, so you can decide which is right for you. Below, we look at the four main types and weigh up the pros and cons of each.

Dyed Window Tint Film
The most common, affordable and readily available window tint is dyed film. This has a sticky back to fix it to the window, and then a heat gun is used to stick it properly to the glass. The film appears black from the outside but is relatively clear from within, for good visibility and finish.
- Pros: Affordable, easy to apply, decent tinted finish.
- Cons: Dye can fade over time, average-poor cooling effect and UV protection in the summer.
Metallised Window Tint Film
This type of film contains microscopic metal particles, which help to tint the glass while providing a shiny, metallic finish. Metallised films are excellent for keeping heat out of the cabin, providing a dense reflective coating. They’re also useful for reinforcing windscreens, making them less liable to shattering.
- Pros: Strong and resistant to scratching, good insulator in the summer and winter.
- Cons: Metal particles can interfere with phone, infotainment and radio reception.
Carbon Window Tint Film
Carbon film is a step up from metallised window tinting, as it contains carbon particles which don’t interfere with radio and phone reception. It’s also great for blocking heat from the sun, even in the height of summer, so you won’t need to use the air conditioning as much.
- Pros: Excellent UV protection and insulation, attractive matt finish.
- Cons: Expensive compared to dyed and metallised films.
Ceramic Window Tint Film
The crème-de-la-crème of window tints, this contains ceramic particles which offer excellent protection against harmful UV rays and solar heat, keeping the car nice and cool in the summer. It’s the newest and most expensive tinting film out there, and it also offers the best finish and the best longevity, as it’s super resistant to scratches and fading.
- Pros: Tough and hardwearing, classy matt finish, great protection from UV and heat.
- Cons: Very expensive and only available from specialist manufacturers.
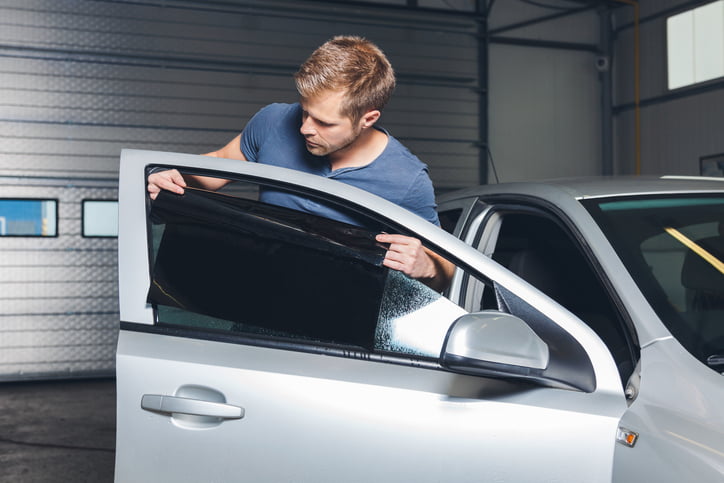
How to Apply Window Tint Film in 8 Simple Steps
While many people prefer to have aftermarket tints applied by a professional, it is possible to apply it yourself if you have the right tools. Below, we provide practical steps on how to apply window tint film.

What You’ll Need
- A heat gun
- Craft or Stanley knife
- A spray water bottle
- Metal file (for finishing)
- Microfibre cloth, squeegee and window razor
- Step 1: Clean the interior glass where the film will be applied. We’d recommend using a dedicated car window cleaning product to remove grease, marks and smears. When you’re satisfied the glass is completely clean, use a squeegee and a window razor to remove excess moisture and dry the glass.
- Step 2: Start by spraying the exterior glass of the window you’re working on with water. Water holds the film gently in place, so you can adjust it and cut the film to size without having to hold it awkwardly against the glass (which would be tricky, even with the steadiest of hands). Then, cut the film by pressing it into the window recess and trimming it with a knife. Follow the lines of the window frame to cut as precisely as possible, and round off the corners to prevent peeling and dog ears. Remember, you’ll need to wind down the window slightly to make sure the film is cut to the right shape.
- Step 2: Use a heat gun to shape the film to the exact size and shape of the window. The heat will allow the film to stretch and reshape easily, particularly if you use a piece of plastic to mould it into the corners. Once you’re happy the film is the right shape, gently remove it from the glass and set it aside. We’d recommend clipping it up so that it’s hanging, or else laying it flat on a clean surface. If you’re laying it down, spray the surface with water first to prevent sticking.
- Step 4: Remove the backing and spray down the film with clean water. Keeping the film as moist as possible will make it easier to adjust and move into place on the glass before it sticks firmly, so you can be sure of the perfect fit. Then, you’re ready to begin applying it to the glass.

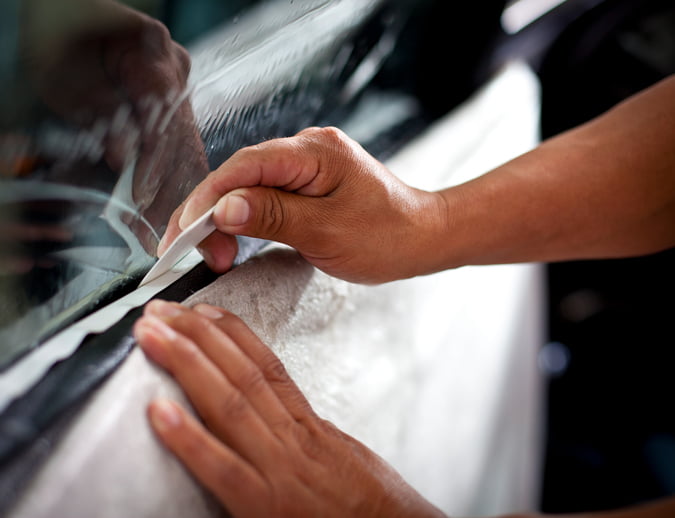
- Step 5: Carefully press the film on to the inside of the window, using a plastic card to push it into the corners. You should work your way from the middle outward, forcing the air towards the edges. A heat gun will help keep the film pliable until you’re happy you’ve removed all the creases and air pockets – just remember to apply it to the outside of the glass so as not to melt the film.
- Step 6: Use a metal file on the edge of the window to ensure a smooth and rounded finish. This will help prevent the film from becoming unstuck when the window is moved up or down.
Additional tips: When you’re applying the tinting film to the rear window or windscreen, it’ll make it easier if you roll it onto the glass from one side to the other. You should also give the film time to cure and set, so avoid winding the windows down or using wipers for two days after application.
These steps are for guidance only and may not apply to all tint jobs. Always follow the manufacturer’s instructions which are supplied with the tinting film you purchase. We’d also recommend buying pre-cut tints which are specifically designed for the make and model of your car, which takes the stress out of having to cut the film to size yourself.
Remember, while applying window tints at home is doable, you may get a better finish by leaving it up to the pros. If you’d prefer to do it yourself, we’d recommend watching some in-depth guides on YouTube to gain knowledge, tips and expertise from professional tint specialists.
At Redex, our advanced fuel additives can help improve your car’s performance and extend the life of the engine. To find out more, visit the homepage.